
AnTune software setup
System requirements
AnTune software can be installed on a PC that runs windows 2000,XP or newer.Recommend processor speed min 2 GHz as the software is calculation intensive but it will also run at reduced speed on slower processors.
Minimum screen resolution 1280*1024.
GPIB, LAN or USB interface, fully GPIB compatible, for communication with a Vector Network Analyzer is a requirement for full use of the software.
AnTune can be used without VNA as a standalone impedance optimizer by importing/export s1p-files.
In AnTune used VNA software instructions are by enduser editable common IEEE 488.2 commands allowing custom setup or adding not yet supported models of VNA. Most types of Keysight (Agilent, HP) and R&S VNA's are supported as well as VNA's from Copper Mountain Tech.
If your specific model is missing, give us a mail.
GPIB hardware interface from National Instruments and Agilent/HP are fully supported.
NI-VISA driver for theses interfaces from National Instruments must be installed if it not already is done.
Prologix GPIB to serial port interface is not, until further, supported.
Internet connection is required to be able to install and run the software in trial mode. Alternatively exist USB software lock which not require Internet connection. USB lock is only sold together with a full year license.
Administrator rights is required to be able to install and run the software.
Installation
Download installation file (instller.exe) and start installation.AnTune will be default installed in directory C:\program files\AnTune.
At first start of the software will a registration will be required.
A license key will be sent by email, which fully locks up the software for a time limited period.
Installed version will just have basic functionality. Depending on file accesse rights in actual Windows version, will AnTune either automatic download latest version of the software or else must that be done manually by downloading latest AnTune.exe from the download section,
In some cases can additional drivers and settings be needed, depending on what type of GPIB interface you have. If not already installed togeter with your existing hardware is NI-VISA drivers needed. Latest NI-VISA driver for your hardware can be found at http://www.ni.com/visa/ With LabVIEW and NI-VISA installed, you should be ready to go. If any problems, contact us.
AnTune startup
Before starting AnTune a VNA should be connected and setup for actual measurement frequency range in S11 Smith chart mode and 201 measurement points.If no instruments is detected can AnTune still import S11 data from Touchstone (.s1p) files.
AnTune use
The software is complex but most settings are self configuring and user settings reduced to a minimum.Measurement parameters are saved when software is shut down and retrieved at next startup which helps the user to concentrate on antenna design, not how to setup software.
Setup procedure:
1. When AnTune is started, select number of markers and place at wished frequencies. Normally this is somewhere in within actual frequency bands and not at absolute band edges.
2. Select preferred matching network topology.
3. Select "automatic tuning".
4. Do minor modification on the development antenna or impedance matching network, while keeping an eye on AnTune, were you will get all needed information on how to optimize your design.
That is it. Within minutes of first use of AnTune can you have great benefit of this software. If you also master the calibration page on this site, will you soon do your most impressive antenna design ever.
Other functions
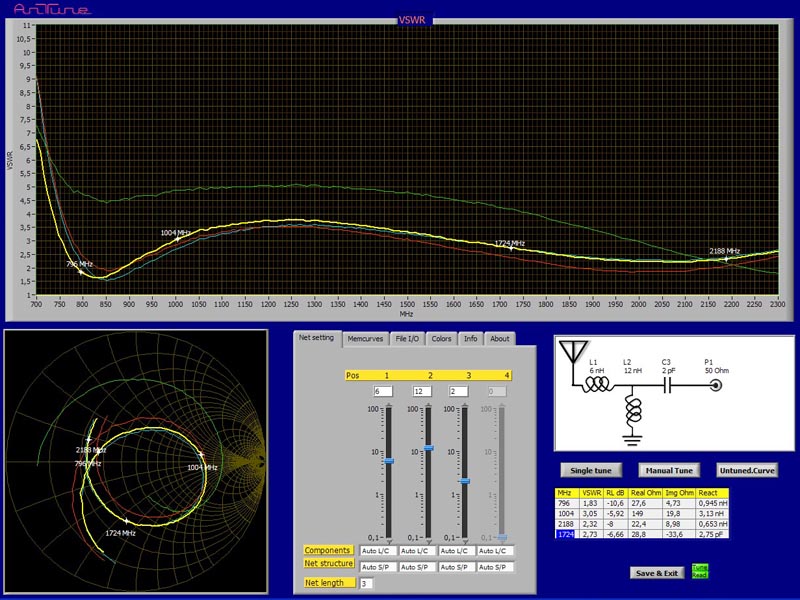
1. Top diagram can show VSWR, transmission loss, return loss factor, impedance, reactanse, inductance....
In the tabbed menu:
2. Network complexity and component values can be set to be controlled automatically or manual.
3. Memories settings. Save, show/hide buttons and preferred colors can be adjusted.
4. File I/O, from here can curves be imported or exported as s1p or html formats.
5. Adjust user interface colors, text size and markers for main screen and diagrams.
6. Info, and about shows text with quick info about software functions and status.
Buttons on main screen:
7. Single tune, just do one matching network calculation and then reverts to manual component value control.
8. Selects manual tune or automatic tune.
9. Tuned/untuned curve. Select what curve that will be showed as main curve in the diagrams.
10. A summary table of cursor values. From here marker frequency setting can be adjusted.
11. Save & Exit, saves all settings including current curves and exits AnTune program.
Due to ongoing development can some functions be added or disappear.